

SmartDeploy provides an optional Build Wizard which you can use to create your first VM. This wizard can create a blank virtual hard disk and a set of VM configuration files for certain supported platforms. You can then power on this VM in your virtualization software and proceed to install Windows and build your golden reference VM. Alternately, you can simply create the VM yourself using the virtualization software.
Regardless of which method you use, when you create and configure virtual machines (VMs) that you intend to use as a golden reference VM, it is important that the installation of Windows and other software is as "clean" as possible.
Here is our list of best practices for creating your reference virtual machines:
- Do not attempt to capture a physical machine, or to create your VM using a physical-to-virtual (P2V) conversion, or to use any other method in which the OS has ever been installed on physical hardware.
-
Do not use third-party deployment tools to deploy a pre-existing image to a VM. Always start with a new, blank VM and install Windows using OS media from an official Microsoft source only.
-
Do not install in-place upgrades or Windows "feature updates" onto the VM. Always install the version of Windows that you want to deploy using an ISO file which includes the specific version of Windows that you wish to deploy. This includes upgrades from Windows 7/8.1 to 10, as well as moving from one Windows 10 Version to the next.
- A "feature update" is defined as a Windows Update which upgrades a system from one Semi-Annual Channel version of Windows to a later version, e.g. Windows 10 Version 20H2 -> Windows 10 Version 21H1. Feature updates install as in-place upgrades and can leave the resulting image more likely to fail capture, Sysprep, or deployment.
- Each Semi-Annual Channel version of Windows 10 is supported and fully security-patched by Microsoft until that specific version's end of service, which is 18-30 months from its original release date:
https://docs.microsoft.com/en-us/windows/release-health/release-information
- When you run Windows Update, ensure that the entire update process has completed, and then restart the VM to let any pending update configurations to finish. Repeat this process a few times until Windows Update reports that the VM is completely up-to-date, without any updates showing "Pending", "Ready to Install", or similar states.
-
Windows feature updates may appear as "available" in Windows Update. For all Windows 10 versions since Version 1903, feature updates do not download or install automatically until the installed OS version is nearing End of Service, and you do not need to do anything to resolve this status before shutting down and capturing your VM, as long as the status at the top of Windows Update window is "You're up to date".
Example: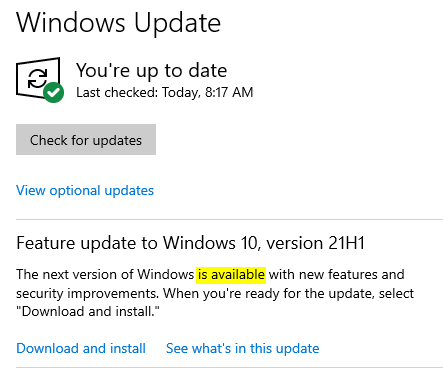
-
Windows feature updates may appear as "available" in Windows Update. For all Windows 10 versions since Version 1903, feature updates do not download or install automatically until the installed OS version is nearing End of Service, and you do not need to do anything to resolve this status before shutting down and capturing your VM, as long as the status at the top of Windows Update window is "You're up to date".
- Do not install the SmartDeploy Client onto your reference VM. This must be installed on each individual endpoint, and this can be done automatically at deployment time - see Client Installation - During Deployment.
- Do not install any tools or VM additions. All additions (device drivers, etc.) should be deployed to your target devices via Platform Pack. Please see the Platform Packs section of the User's Guide for more information.
- Do not install antivirus software on the VM. Antivirus software can often interfere with the capture and deployment process. Consider using an Application Pack to install your antivirus software as part of deployment. Please see the Application Packs section of the User's Guide for more information.
- Avoid joining the Reference VM to your domain if possible, as it may receive software or Group Policy Objects which may make it unfavorable for capture. If the VM was joined to your domain, you must return it to a workgroup and then restart it before proceeding with the capture of your image.
- Do not run Sysprep before you capture your image. As part of deployment, SmartDeploy will run Sysprep for you - this way, your reference VM will remain in a state where it can be reliably updated and captured in the future.
- When you are ready to shut down the VM and capture your image, open a Command Prompt, and run the following command: shutdown /s /t 0.
- If your VM has more than one "snapshot" (or a similar saved state), then you must capture it using the warm/online capture procedure.